基于Android U
Window的操作包括对Window的添加、更新和删除。对于Window的操作,最终都是交由WMS来进行处理的。Window的操作分为两大部分,一部分是WindowManager处理部分,另一部分是WMS处理部分。我们知道Window分为三大类,分别是Application Window(应用程序窗口)、Sub Window(子窗口)和System Window(系统窗口),对于不同类型的Window添加过程会有所不同,但是对于WMS处理部分,添加的过程基本上是一样的,WMS对于这三大类的Window基本上是“一视同仁”的,如下图。
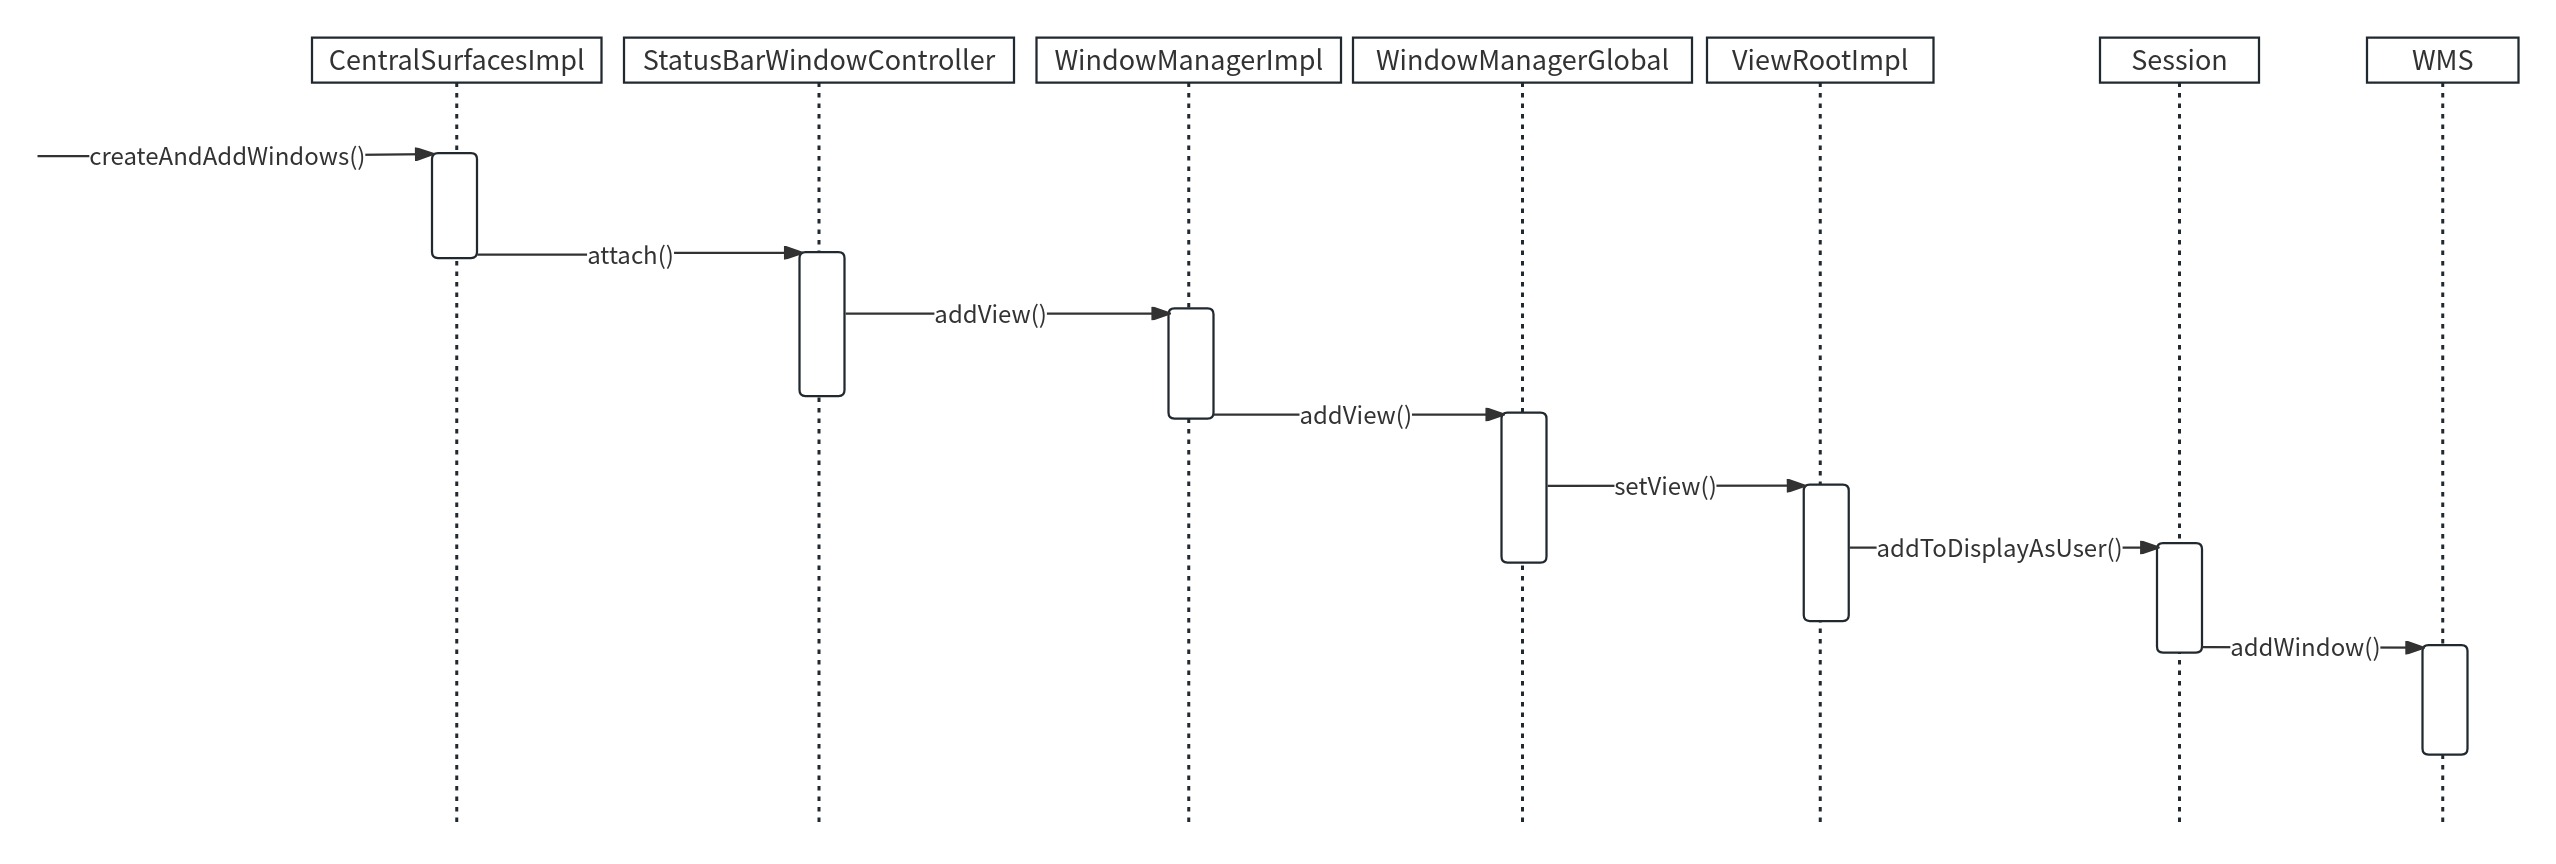
系统窗口的添加过程 这里以系统窗口StatusBar为例,StatusBar是SystemUI的重要组成部分,具体就是指系统状态栏,用于显示时间、电量和信号等信息。
1 2 3 4 5 6 frameworks/base/packages/SystemUI/src/com/android/systemui/statusbar/phone/CentralSurfacesImpl.javapublic void createAndAddWindows (@Nullable RegisterStatusBarResult result) {
注释1处构建StatusBar的视图。
注释2处添加StatusBar的视图。
1 2 3 4 5 6 7 8 9 10 11 12 13 14 15 16 17 18 19 20 21 22 23 24 25 26 27 28 29 30 31 32 33 34 35 36 37 38 39 40 41 42 43 44 45 46 47 48 49 50 51 52 53 54 55 56 57 58 59 frameworks/base/packages/SystemUI/src/com/android/systemui/statusbar/window/StatusBarWindowController.javapublic void attach () {this ::calculateStatusBarLocationsForAllRotations);true ;private WindowManager.LayoutParams getBarLayoutParams (int rotation) {LayoutParams lp = getBarLayoutParamsForRotation(rotation);new WindowManager .LayoutParams[4 ];for (int rot = Surface.ROTATION_0; rot <= Surface.ROTATION_270; rot++) {return lp;private WindowManager.LayoutParams getBarLayoutParamsForRotation (int rotation) {int height = SystemBarUtils.getStatusBarHeightForRotation(mContext, rotation);LayoutParams lp = new WindowManager .LayoutParams(new Binder ();0 );"StatusBar" );final InsetsFrameProvider gestureInsetsProvider = new InsetsFrameProvider (mInsetsSourceOwner, 0 , mandatorySystemGestures());final int safeTouchRegionHeight = mContext.getResources().getDimensionPixelSize(if (safeTouchRegionHeight > 0 ) {0 , safeTouchRegionHeight, 0 , 0 ));new InsetsFrameProvider [] {new InsetsFrameProvider (mInsetsSourceOwner, 0 , statusBars())new InsetsFrameProvider (mInsetsSourceOwner, 0 , tappableElement())return lp;
注释1处通过getBarLayoutParams()创建LayoutParams来配置StatusBar视图的属性,包括Width、Height、Type、Flag、Gravity等。注释3处还设置了TYPE_STATUS_BAR,表示StatusBar视图的窗口类型是状态栏。
注释2处调用了WindowManager的addView()方法,addView()方法定义在WindowManager的父类接口ViewManager中,而addView()方法则是在WindowManagerImpl中实现的。
1 2 3 4 5 6 7 frameworks/base/core/java/android/view/WindowManagerImpl.javapublic void addView (@NonNull View view, @NonNull ViewGroup.LayoutParams params) {383 ,params);
addView()方法的第一个参数是View,说明窗口也是以View的形式存在的。addView()方法中会调用WindowManagerGlobal的addView()方法。
1 2 3 4 5 6 7 8 9 10 11 12 13 14 15 16 17 18 19 20 21 22 23 24 25 26 27 28 29 30 31 32 33 34 35 36 37 38 39 40 41 42 43 44 45 46 frameworks/base/core/java/android/view/WindowManagerGlobal.javapublic void addView (View view, ViewGroup.LayoutParams params, Display display, Window parentWindow, int userId) {final WindowManager.LayoutParams wparams = (WindowManager.LayoutParams) params;if (parentWindow != null ) {else {final Context context = view.getContext();if (context != null 0 ) {View panelParentView = null ;synchronized (mLock) {if (windowlessSession == null ) {new ViewRootImpl (view.getContext(), display);else {new ViewRootImpl (view.getContext(), display,new WindowlessWindowLayout ());try {catch (RuntimeException e) {
WindowManagerGlobal中维护了三个和Window操作相关的列表,分别是:View列表(ArrayList<View> mViews)、布局参数列表 (ArrayList<WindowManager.LayoutParams> mParams)和ViewRootImpl列表(ArrayList<ViewRootImpl> mRoots)。
addView()首先会对参数view、params和display进行检查。
注释1处,如果当前窗口要作为子窗口,就会根据父窗口对子窗口的WindowManager.LayoutParams类型的wparams对象进行相应调整。注释3处将添加的View保存到View列表中。注释5处将窗口的参数保存到布局参数列表中。
在注释2处创建了ViewRootImpl并赋值给root,紧接着在注释4处将root存入到ViewRootImpl列表中。
注释6处将窗口和窗口的参数通过setView()方法设置到ViewRootImpl中,可见我们添加窗口这一操作是通过ViewRootImpl来进行的。ViewRootImpl身负了很多职责,主要有以下几点:
View树的根并管理View树;
触发View的测量、布局和绘制;
输入事件的中转站;
管理Surface;
负责与WMS进行进程间通信。
1 2 3 4 5 6 7 8 9 10 11 12 13 14 15 16 17 18 19 20 21 22 frameworks/base/core/java/android/view/ViewRootImpl.javapublic void setView (View view, WindowManager.LayoutParams attrs, View panelParentView, int userId) {synchronized (this ) {if (mView == null ) {try {catch (RemoteException | RuntimeException e) {finally {
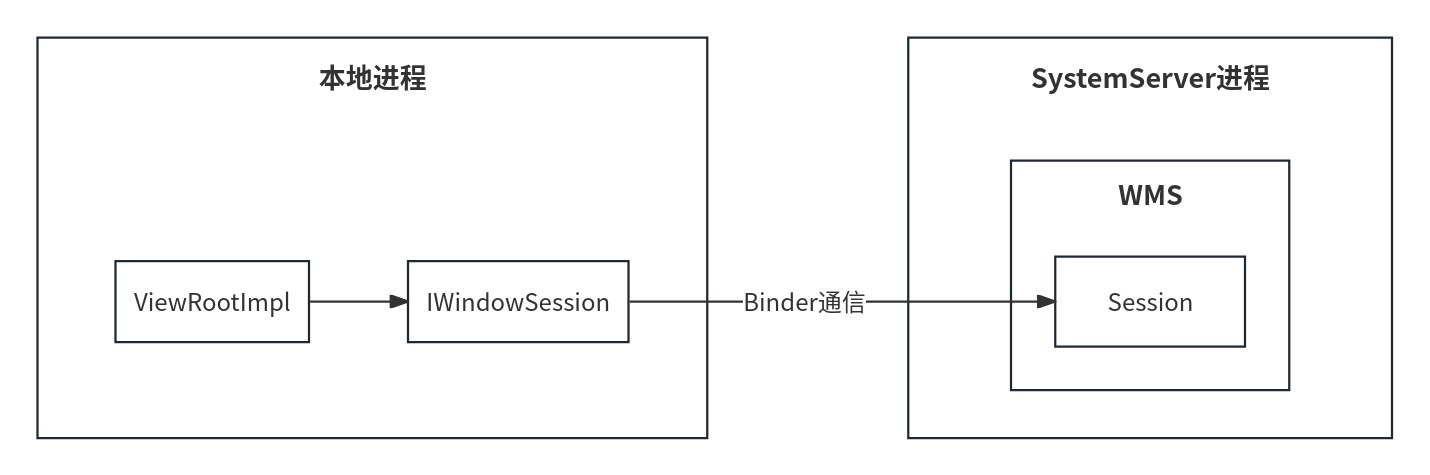
调用mWindowSession的addToDisplayAsUser()方法,mWindowSession是IWindowSession类型的,它是一个Binder对象,用于进行进程间通信,IWindowSession是Client端的代理,它的Server端的实现为Session,此前的代码逻辑都是运行在本地进程的,而Session的addToDisplayAsUser()方法则运行在WMS所在的进程(SystemServer进程)中。
从图中可以看出,本地进程的ViewRootImpl要想和WMS进行通信需要经过Session,那么Session为何包含在WMS中呢?我们接着往下看Session的addToDisplayAsUser()方法。
1 2 3 4 5 6 7 8 9 10 frameworks/base/services/core/java/com/android/server/wm/Session.javapublic int addToDisplayAsUser (IWindow window, WindowManager.LayoutParams attrs, int viewVisibility, int displayId, int userId, @InsetsType int requestedVisibleTypes, InputChannel outInputChannel, InsetsState outInsetsState, InsetsSourceControl.Array outActiveControls, Rect outAttachedFrame, float [] outSizeCompatScale) {return mService.addWindow(this , window, attrs, viewVisibility, displayId, userId,
在addToDisplayAsUser()方法中调用了WMS的addWindow()方法,并将自身也就是Session作为参数传了进去,每个应用程序进程都会对应一个Session,WMS会用ArrayList来保存这些Session,这就是为什么WMS包含Session的原因。这样剩下的工作就交给WMS来处理,在WMS中会为这个添加的窗口分配Surface,并确定窗口显示次序,可见负责显示界面的是画布Surface,而不是窗口本身。WMS会将它所管理的Surface交由SurfaceFlinger处理,SurfaceFlinger会将这些Surface混合并绘制到屏幕上。
Activity的添加过程 无论是哪种窗口,它的添加过程在WMS处理部分中基本是类似的,只不过会在权限和窗口显示次序等方面会有些不同。但是在WindowManager处理部分会有所不同,这里以最典型的应用程序窗口Activity为例,Activity在启动过程中,如果Activity所在的进程不存在则会创建新的进程,创建新的进程之后就会运行代表主线程的实例ActivityThread,ActivityThread管理着当前应用程序进程的线程,这在Activity的启动过程中运用得很明显,当界面要与用户进行交互时,会调用ActivithThread的handleResumeActivity()方法。
1 2 3 4 5 6 7 8 9 10 11 12 13 14 15 16 17 18 19 20 21 22 23 24 25 26 27 28 29 30 31 frameworks/base/core/java/android/app/ActivityThread.javapublic void handleResumeActivity (ActivityClientRecord r, boolean finalStateRequest, boolean isForward, boolean shouldSendCompatFakeFocus, String reason) {if (!performResumeActivity(r, finalStateRequest, reason)) { return ;final Activity a = r.activity;if (r.window == null && !a.mFinished && willBeVisible) {View decor = r.window.getDecorView();ViewManager wm = a.getWindowManager(); if (a.mVisibleFromClient) {if (!a.mWindowAdded) {true ;else {else if (!willBeVisible) {
注释1处的performResumeActivity()方法最终会调用Activity的onResume()方法。
注释2处得到ViewManager类型的wm对象,注释3处调用了ViewManager的addView()方法,而addView()方法则是在WindowManagerImpl中实现的,此后的过程在上面的系统窗口StatusBar的添加过程中已经讲过,唯一需要注意的是ViewManager的addView()方法的第一个参数为DecorView,这说明Activity窗口中会包含DecorView。
Window的更新过程
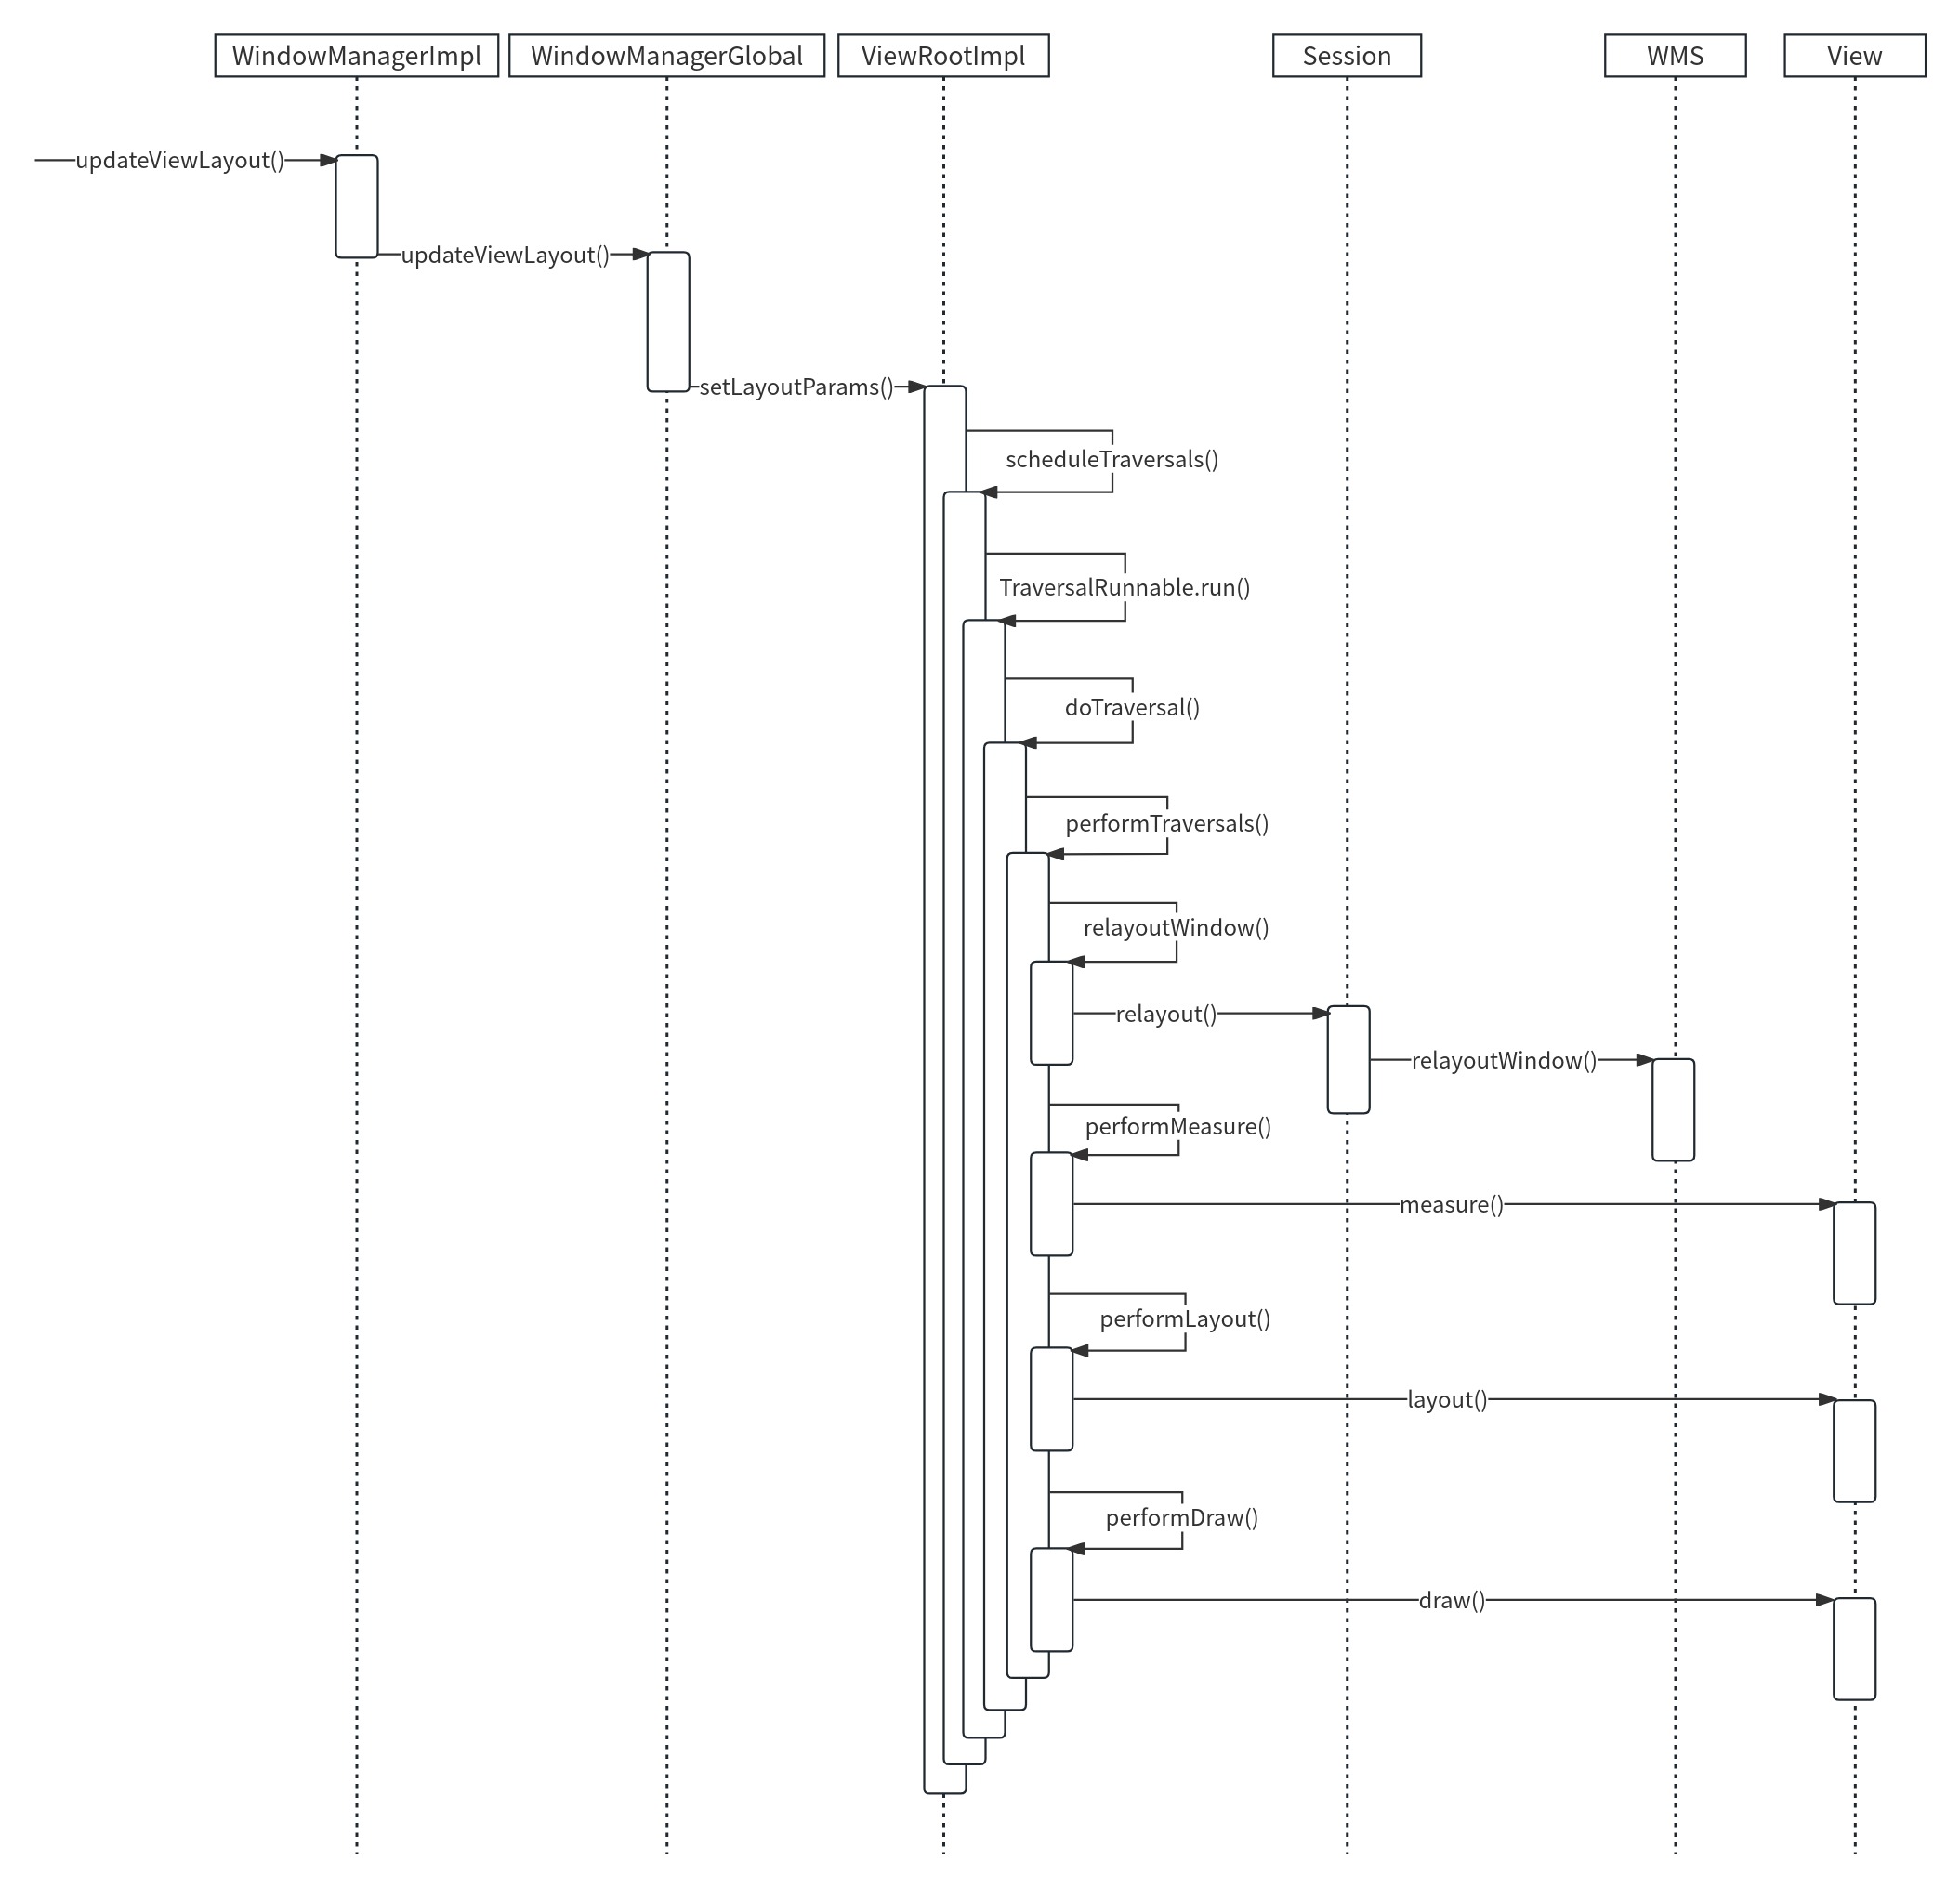
Window的更新过程和Window的添加过程是类似的。需要调用ViewManager的updateViewLayout()方法,updateViewLayout()方法在WindowManagerImpl中实现。
1 2 3 4 5 6 frameworks/base/core/java/android/view/WindowManagerImpl.javapublic void updateViewLayout (@NonNull View view, @NonNull ViewGroup.LayoutParams params) {384 ,params);
调用WindowManagerGlobal的updateViewLayout()方法。
1 2 3 4 5 6 7 8 9 10 11 12 13 14 15 frameworks/base/core/java/android/view/WindowManagerGlobal.javapublic void updateViewLayout (View view, ViewGroup.LayoutParams params) {final WindowManager.LayoutParams wparams = (WindowManager.LayoutParams)params;synchronized (mLock) {int index = findViewLocked(view, true ); ViewRootImpl root = mRoots.get(index); false );
注释1处将更新的参数设置到View中。
注释2处得到要更新的窗口在View列表中的索引,注释3处在ViewRootImpl列表中根据索引得到窗口的ViewRootImpl。
注释4和5处用于更新布局参数列表,注释6处调用ViewRootImpl的setLayoutParams()方法将更新的参数设置到ViewRootImpl中。
1 2 3 4 5 6 7 8 frameworks/base/core/java/android/view/ViewRootImpl.javapublic void setLayoutParams (WindowManager.LayoutParams attrs, boolean newView) {synchronized (this ) {
ViewRootImpl的setLayoutParams()方法在最后会调用ViewRootImpl的scheduleTraversals()方法。
1 2 3 4 5 6 7 8 9 10 11 frameworks/base/core/java/android/view/ViewRootImpl.javavoid scheduleTraversals () {if (!mTraversalScheduled) {true ;null );
注释1处的Choreographer译为“舞蹈指导”,用于接收显示系统的VSync信号,在下一个帧渲染时控制执行一些操作。Choreographer的postCallback()方法用于发起添加回调,这个添加的回调将在下一帧被渲染时执行。这个添加的回调指的是注释1处的TraversalRunnable类型的mTraversalRunnable。
1 2 3 4 5 6 7 frameworks/base/core/java/android/view/ViewRootImpl.javafinal class TraversalRunnable implements Runnable {@Override public void run () {
在TraversalRunnable的run()方法中调用了doTraversal()方法。
1 2 3 4 5 6 7 8 frameworks/base/core/java/android/view/ViewRootImpl.javavoid doTraversal () {if (mTraversalScheduled) {
doTraversal()方法中又调用了performTraversals()方法,performTraversals()方法使得ViewTree开始View的工作流程。
1 2 3 4 5 6 7 8 9 10 11 12 13 14 15 16 17 18 19 20 21 22 23 24 25 26 27 28 29 30 31 32 33 34 35 36 37 38 39 40 41 42 43 44 45 46 47 48 49 50 51 frameworks/base/core/java/android/view/ViewRootImpl.javaprivate void performTraversals () {if (mFirst || windowShouldResize || viewVisibilityChanged || params != null try {catch (RemoteException e) {finally {if (!mStopped || mReportNextDraw) {if (mWidth != host.getMeasuredWidth() || mHeight != host.getMeasuredHeight()int childWidthMeasureSpec = getRootMeasureSpec(mWidth, lp.width,int childHeightMeasureSpec = getRootMeasureSpec(mHeight, lp.height,else {if (didLayout) {if (!isViewVisible) {else if (cancelAndRedraw) {else {if (!performDraw() && mActiveSurfaceSyncGroup != null ) {
注释1处的relayoutWindow()方法内部会调用IWindowSession的relayout()方法来更新Window视图,最终会调用WMS的relayoutWindow()方法。
注释2、3、4处分别调用performMeasure()、performLayout()、performDraw()方法,它们的内部又会调用View的measure()、layout()、draw()方法,这样就完成了View的工作流程。在performTraversals()方法中更新了Window视图,又执行Window中的View的工作流程,这样就完成了Window的更新。